DIY
Showing posts with label DIY. Show all posts

Natural Moisturizer Options for Dry Winter Face

1.19.2017

Do you know how much i love having an online community of friends--a group of women from all over the country/world to reach out to for advice and to share things I've learned or am learning with? It's pretty darn amazing, really.

For a long time I've been dealing with really dry skin (on my face specifically). It manifests itself in flaky skin, lately around my hairline, but in the past, around my nose. Not only is it not good as far as wrinkles, to have ultra dry skin, but it also makes it hard to wear makeup without it accentuating the problem areas.

So I hoped on IG stories and asked all of you for non-toxic, preferable natural products and solutions you have had success with! I got so many great responses and a lot of other women saying they wanted to hear the suggestions themselves because it's something they're dealing with as well!

Since asking, I've added a few things to my routine. I'm currently using the Everything Oil by Crude for washing my face, which I like, but don't find it quite moisturizing enough on it's own. But someone said they love using the Crude Bloom oil, after they wash with the Crude Everything Oil. Maybe I'll give it a try.
I also started using Apricot Kernel Oil at night, it's much much less absorbent than the Argan oil I was using, which was dry before I finished applying it, which makes me feel like it's moisturizing better. It's a little much for under makeup, so for the morning I'm trying out the Julep Radiance Oil (available at Ulta 'til the end of the month).

So here, my friends, are all of the suggestions I received! Thanks so much for your help!

You can click on the images to shop the oils, and don't forget to the check out the rest of the list below.


*Someone made the wise suggestion of getting a sample of the Josie Maran Argan Oil at Sephora. I always forget that you can do that!

Several people mentioned that they love anything and everything by BeautyCounter
Here are some cute small facial oil businesses:


Here are some homemade oil combos that were suggested:

  • coconut oil+tea trea+vitamin E oil
  • 20 drops geranium, 20 drops elemi, 10 drops frankincense in a bottle of leven rose
  • frankincense + fractionated coconut oil
  • Using Apple Cider Vinegar as a toner
  • Eating a Tablespoon of coconut oil everyday, she said her favorites are Nutriva and Dr Bronners
  • my (*cough*least*) favorite suggestion--DRINK MORE WATER!

DIY Winter Citrus Garland

1.09.2017

DIY Citrus Garland #naturalhomedecor
Citrus season in Arizona, hands-down, is my favorite time of year. It runs from December to April, which means not only am I eating and smelling one of my favorite tastes and smells on earth, but I also get to do it while enjoying our perfect Winter and Spring time temps!

Last year we were on a major natural kick (we still are, but most of it has become habit now, so it seems less relevant). So I decided to make all my own Christmas ornaments. I used popcorn, cranberries, and all types of citrus and I loved how it turned out so much I might have cried when we took down our sweet little tree. The citrus garland hanging on the stairs however, stayed up all year! I didn't see any reason to take down something so lovely.

So while these dehydrated citrus slices make excellent Christmas decor, I won't judge you if I walk in your house in May and see them still hanging around--you'll be in good company.

To make them, you simple pick out what citrus you'd like to use--pink grapefruit and oranges turn out best in my experience, but I've included lemons and limes in the past as well.

You then want to cut slices, not too thick or it will take a looooong time to dehydrate, but not too thin or else they'll burn (and you'll end up with some dark brown ones, like I got this year on accident--i didn't hate them though...) I'd say no more than half and inch, probably a little thinner. Pat the slices gently with a towel or napkin to absorb some of the excess moisture. Turn on your over to a low temperate around 125°. Arrange the slices onto cooling racks and put the cooling racks on cookie sheets--I recommend putting similar sized slices together so if your grapefruit take longer than you lemons, you can just removed one tray. Check on them every hour and you can flip them half way, especially if you're not using cooling racks. The house will smell so insane, you'll want to scream for all your neighbors to come take a wiff, so they can share in the euphoria that is drying citrus.

The slices should look like the majority of the moisture is gone, but not be brown (unless you want some brown ones). When you take them out, let them cool on the racks. They will still be a little tacky, but will continue to dry for the next few days. Feel free to make ornaments or a garland or window charms, whatever your heart fancies, as soon as they're cooled. They look especially beautiful hanging somewhere where they can be backlight by a window, so their colors shine through--you don't have to wait til they're bone dry to create with them!

Off to eat a grapefruit! 👋


on me:
sam edelman petty booties//nordstrom (one sale here)

on him:
striped onesie//j.crew old (buy similar here)
gray label organic overalls//noble carriage (buy here)
navy rainboots//c.o. western chief (buy here)
african market basket//sprouts (buy similar here)

DIY Clean Deodorant

2.03.2016

Bad news: sweating is our body's natural way of ridding toxins from our system, which means anti-perspirants aren't only full of potentially cancer causing chemicals, they're also trapping toxins inside of our bodies. Good news: I'm sharing this non-toxic deodorant recipe that's easy to whip up at home! 

  • 6T of coconut oil, 
  • 4 T arrowroot powder, 
  • 4 T baking soda, 
  • A couple drops of lemon essential oil, a few drops of bergamot oil and a few drops of tea tree oil (all have natural antibacterial properties), 
  • A short, wide mouth glass jar or tin. 


Mix the powders then add the coconut oil, then the essential oil. BAM! You're done. Mine smells like delicious coconut lemon dessert. 

Apparently when you make the switch to a homemade/natural deodorant, your body goes through a detox phase, where it basically is purging your pores of the gunk from anti-perspirants, so you're supposed to go at least a week before you judge whether your new deodorant is working (probably don't plan your armpit detox during the week of a big event or special date!). Good to know, right?

We tried this recipe during the Summer in Arizona, Marcus still uses it exclusively and loves it, I used and liked it when I was waxing my armpits, but found it to be irritating (baking soda) when I was shaving, since I have sensitive skin. Now that I'm not waxing, I switched to using this natural deodorant while I search for another recipe that doesn't use any or so much baking soda.


scenes from the weekend.

10.14.2013

The black paper bats made a comeback. (just cut out of paper and tape on wall)
the girls from @mintdecor and @themodboho took over my house to shoot some of the pretties they have in their shops!
i forsook my hermit ways and went to dessert with an instafriend turned real life friend Sarah! (and she introduced me to some really great music I'll be sharing tomorrow)
more gorgeous pillows from themodboho--i seriously want that lumbar to live in my house with me!!!
Poppy wondering why there are so many new people in our house, we never have visitors!
picked up that pretty runner from the thrift store for $1 :)
and i leave you with the sexiest scenes of them all, husband doing house projects!
What did you do this weekend?

$6 DIY Project//Dotty

9.24.2013

I've been pushing myself this week to create more. I made a little skirt for my friends new baby, I'm working on a fall pancho for myself and I gave this thrifted $2 vase a little make-over.
When I was at the fabric store getting supplies for the afore mentioned sewing projects I came across this gold-leaf pen and since I had a 50% off coupon, I snagged it for $4. (I'm pretty sure I was at JoAnn's but it might have been Michael's--both have apps that offer awesome instant coupons, so i recommend downloading them before you check out!)
I had found this vase last week at the goodwill and I liked the shape, but something about it reminded me a little too much of the 80s, probably because that's when it was made...so I knew I wanted to do something, and this pen made that 'something' gold polka dots!
I just freehanded the dots on, but be careful because if you put too much of the gold leaf on, it will drip--if you catch it soon enough, you can wipe it off, but once it dries, it's not so easy.
or you can buy it here
The flower is fake, but looks really real, I picked it up on a different trip to Michael's, again with a 40% off coupon.
Anyway, I'm happy with my pretty 'new' $6 vase, and I'm even happier with it, because I made it, and that's always fun!
Did you make anything fun this week? Crafts or in the kitchen? I'd love to see/hear!
p.s. thanks for sharing your states' specialties in this post! I can't wait to try them all someday!

Emma Magazine Cameo

9.11.2013

Photo by: Michelle Herrick Makeup & Hair by: Mariana Marie
I told you about this fun morning a while back and promised I'd share the finished product. Take a few minutes, pour yourself a glass of Trader Joe's Sparkling Berry Lemonade (have you tried that stuff? I may have problem, I can't stop!) and enjoy this beautiful DIY Emma magazine--I already went out and bought all the stuff to make the etched glass bottle! Cheers!
(tutorial also found here)

that wall!

8.07.2013

As promised, I present to you my DIY Geo Wall instructions!
I used the sample size Behr paints from the Home Depot--these were the colors I started out with, but ended up changing my mind a few times as I got them up on the wall.
My final colors were:
Green//Garden Sprout
Navy//Velvet Evening
Dark Orange//Mesa Sunrise
Pink//Custom Color Match (LL-4 RL-13 VUL-19)
Light Blue//Custom Color Match (EL-41 RL-11 VUL-6)
Nude//Custom Color Match (CL-17 RUL-3 TL-1)
For the darker colors, like the green and the navy, I needed more than one sample size, so keep that in mind if you choose a lot of darker colors.
I stressed about how to make the perfect shapes for months, and then final realized I just needed to lock myself in the room and start taping--after all, in my mind, DONE IS BETTER THAN PERFECT when it comes to house projects.

So, I randomly taped off a starting point and as I got a few painted, I changed things here and there.
As you can see, I ripped off pieces of the paint chips and taped them where I thought the colors would look best, so i could keep a visual of my color plans. It also helped me not use too much of one color--i didn't want to end up with 5 green shapes and then not have any room left for my blue, I also didn't want one side of the wall to have tons of peach and one side to have none, etc.
I won't lie, it got a little overwhelming at times--so I had to take a few breaks.
It was at this point, i really wanted to stop. I was getting impatient about having to wait for each shape to dry before i could work on the shape next to it--as you can see, the tape has to go over the painted triangle in order to paint the next triangle without blending all the edges. In order to tape over it, it of course needed to by completely dry. I think the whole project took me 3 days.
p.s. I prefer the green Frog Tape to the blue tape--but i ran out half way, so I used some of both.
When it was all said and done, it was totally worth all the hard work--i get giddy every time i walk by this room--it's such a happy space for a my craft room and i'm really proud of how it turned out!
If you have any questions feel free to email me or leave them in the comments!

{foodie} friday: snack time for grown-ups

3.15.2013

bruschetta is one of my favorite foods in the world--i crave it all the time. 
in tempe there is a place called la bocca and it has the best bruschetta of all time, but since it's kind of far and i'm not made of money sometimes i just have to make it at home. 
so here's one of my favorite little snacks:
slice up a mini baguette
toast it in a toaster oven or broil it in the oven
cut fresh tomatoes and fresh mozerella cheese in small cubes
slice fresh basil leaves into stripes
smear a small spoonful of pesto on the warm toast
pile on the toppings
drizzle a balsamic glaze over top
enjoy!
+i got my mini baguette from fry's for 99 cents and it's quite yummy
+pesto was from trader joe's, you can find it in the spagetti sauce section and it's delish
+to make a balsamic reduction simply pour a cup of balsamic vinegar in a saucepan over medium heat, bring vinegar to a boil, turn the heat down to a simmer, stirring occasionally. simmer until the reduction is about half the amount you started with--but make sure to keep the heat down or you'll get a rather stiff reduction and it will be hard to drizzle.

anyone have a great pesto recipe i should try?

wood's a burnin' DIY

1.27.2013

this weekend Marcus and i finally got social and met up with my insta buddy Hillary and her husband. 
we met virtually through a common interest in DIYing (and then strangely realized that Marcus and Hillary had gone to jr. high together, and her husband, Mitch, and i had gone to a cabin together once in high school)--small world much?
anyway, we had been talking about getting together and crafting for a long time, but our schedules never seemed to match up.
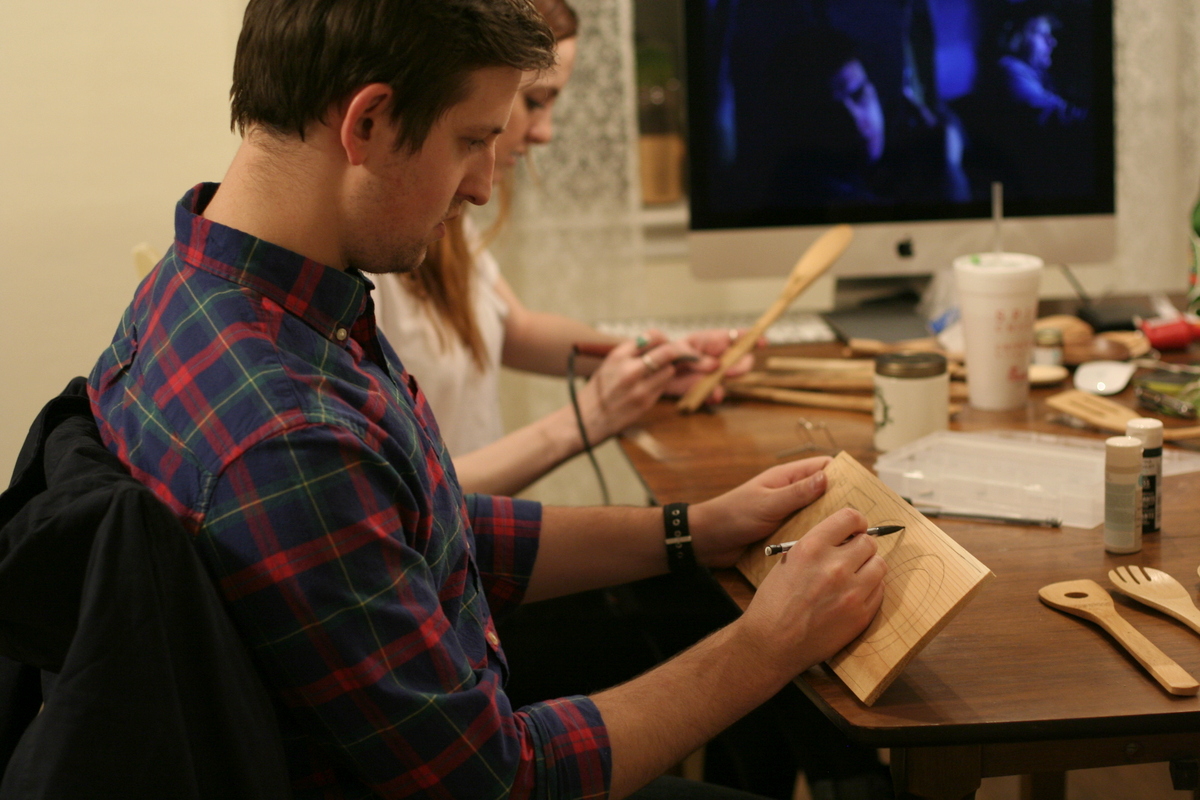
Luckily Friday the stars aligned and we had such a fun night getting to know each other, playing with their wookie dog, Sophie  watching an old classic (dumb & dumber) and wood burning these cooking spoons. it was my first time and now it's safe to say i'm an addict and can't wait to get my hands on my own wood burner. Hillary said you can pick one up at Michael's for a measly $25, but i think i'm going to order this one i found on amazon for even cheaper!
We picked up this utensil pack for super cheap and the boys bought a pack of cedar planks to burn our name/house number (which smelled so good by the way!).
we then googled around for a bit to get some design inspiration, sketched out our ideas with pencil first and then burned the night away--it was pretty darn easy and turned out pretty darn adorable.

yay for new friends and new pretties!
have you ever wood burned? 
what should i try when i get my own?

date night for one.

12.03.2012

it's been a long time coming, but i've been feeling really crafty lately and since marcus has been glued to the computer with finals and all, it's been an ideal time to catch up on long denied date nights with my pinterest boards. 
i've seen versions of these floating around, not sure if they all have tutorials attached, but this is the one i looked at for inspiration: HERE, although i ended up doing it a little differently.
i used similar supplies, but found them all at Joann's and used their app to get 40% off the most expensive item--that's right, i got a whopping $1.50 taken off my total... 
I also didn't get a huge thing of paint, so i didn't dip mine, i just rubbed the paint on with my finger. I only covered the front of the feather because the paint didn't want so stay on the back as nicely (and since you can't see the back, i didn't mind.)
I then used white sewing thread that i had at the house already to turn them into a garland and finally painted some tape gold and taped it on the wall. 
it's pretty technical stuff, i know...

The whole project cost about $9, but i still have extra gold paint and glitter to use on other projects.
Also, the pheasant feathers were gifted to me from my nephew, so sorry--not sure where you can get yourself some.

I'm pretty excited about how they turned out and will probably keep them around all year. 
Or who knows--they may turn into tree ornaments!
© i believe in unicorns. Maira Gall.